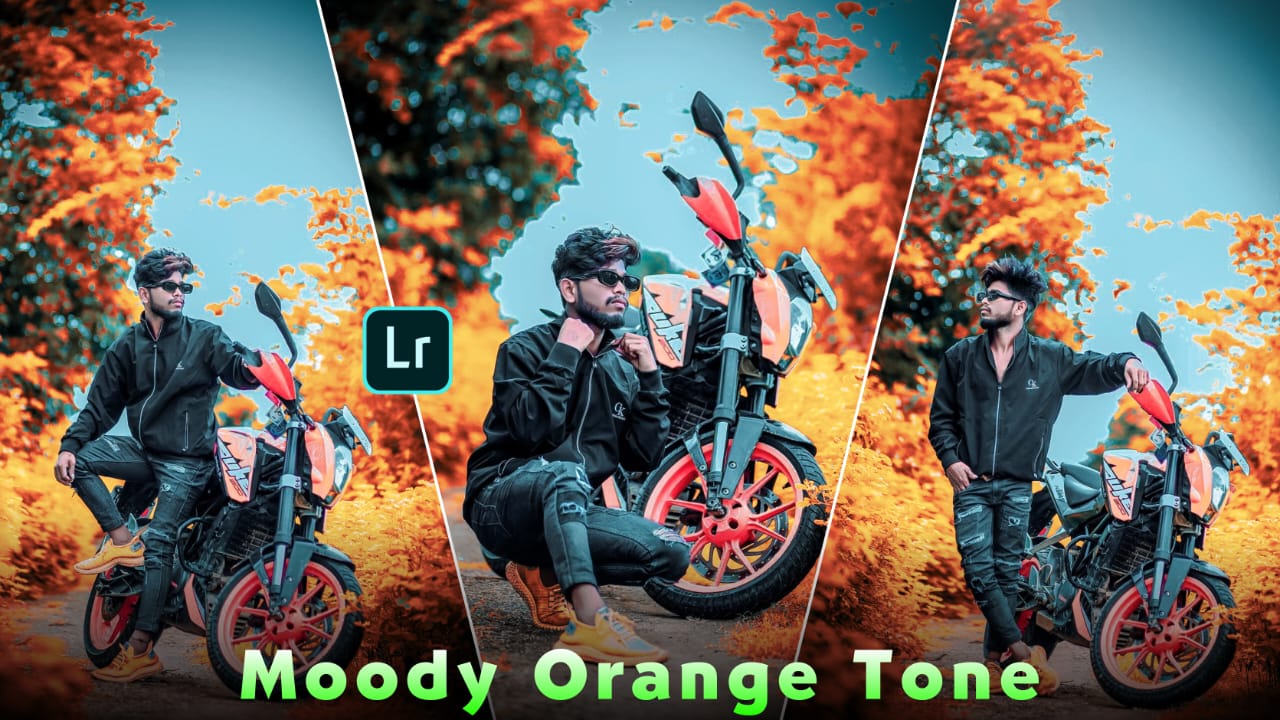
Hello friends, I am Pabitra from PABITRA EDITOGRAPHY, and I warmly welcome you to my official website. If you follow my YouTube channel, you already know my passion for creating stunning photo editing tutorials that help you transform ordinary pictures into extraordinary masterpieces. Today, in this highly requested article, I am incredibly excited to share my premium, highly sought-after Moody Orange Lightroom Preset with all of you, absolutely free.
We all know the struggle of capturing a beautiful moment only to find that the lighting or colors in the final photograph look dull, lifeless, or uninspiring. This is exactly where professional color grading comes into play. Everyone knows that high-quality, 1-click Lightroom mobile presets are the secret weapon of Instagram influencers and professional photographers. With the preset I am providing today, you can effortlessly edit your bad or dull photos, transforming them beautifully with just a single tap. So friends, read this entire guide carefully, as I will explain how to download this Moody Orange preset for Lightroom free of cost, how to install it, and how to tweak it to perfection. If you face any issues while downloading or using this Lightroom Moody Orange preset, do not hesitate to comment below!
What is the Moody Orange Aesthetic and Why is it so Popular?
The “Moody Orange” aesthetic is currently one of the most trending and visually appealing color grading styles across social media platforms like Instagram, Pinterest, and Facebook. But what exactly is it? At its core, the Moody Orange tone plays with the concept of color contrast, specifically focusing on the complementary colors of teal (blues/greens) and orange. By desaturating the background greens and pushing them towards a dark, moody cyan, and simultaneously enhancing the skin tones and warm highlights into a rich, glowing orange, this preset creates a cinematic, professional vibe.
This specific aesthetic is incredibly popular because it instantly draws the viewer’s eye to the main subject. The human eye is naturally attracted to warm colors like orange, especially when they are contrasted against a dark, moody background. Whether you are clicking pictures on a bustling city street, a dense forest, a cozy cafe, or just taking random selfies during the golden hour, the Moody Orange preset adds a layer of mystery and professional polish to your images. It eliminates distracting neon colors and unifies the overall color palette of your photograph, making your Instagram feed look cohesive, aesthetic, and visually striking.
Key Benefits of Using Our Moody Orange Lightroom Preset
When you download and apply the Moody Orange preset from Pabitra Editography, you are not just applying a random filter; you are applying hours of careful color calibration. There are numerous benefits to using this specific preset for your daily photo editing workflow. First and foremost, it saves an incredible amount of time. Instead of spending 30 to 40 minutes tweaking exposure, contrast, highlights, and individual HSL sliders, you get a professional baseline in literally one second.
Secondly, it provides consistency. If you want to become a successful content creator, your photos need to have a signature look. Using this preset across all your photos ensures that your profile grid looks professionally curated. Furthermore, this preset is highly versatile. While some presets only work on pictures taken in bright sunlight, our Moody Orange preset has been optimized to work beautifully on cloudy days, indoor lighting, and low-light street photography. Below is a quick overview of the benefits you will experience:
- 1-Click Magic: Instantly transforms dull, flat images into cinematic masterpieces without requiring advanced editing knowledge.
- Skin Tone Protection: Carefully calibrated so that the orange tones do not make human skin look unnatural, burnt, or overly saturated.
- Cross-Platform Compatibility: Works flawlessly on both the free Lightroom Mobile app (Android and iOS) and the desktop version of Adobe Lightroom.
- Non-Destructive Editing: Presets do not ruin your original photo; you can always revert to the original image or tweak the settings further.
- Professional Cohesion: Gives your social media feeds a unified, premium, and branded appearance.
Moody Orange Tone vs. Normal Photo (Comparison Table)
| Feature / Element | Original / Normal Photo | With Moody Orange Preset Applied |
| Overall Vibe | Flat, natural, sometimes dull or lacking emotion. | Cinematic, intense, dramatic, and highly engaging. |
| Green Foliage (Trees/Grass) | Bright, distracting neon greens and yellows. | Desaturated, dark, moody tones bordering on deep cyan/black. |
| Skin Tones | Can look washed out, uneven, or overly red/magenta. | Smooth, warm, rich orange/bronze that pops beautifully. |
| Shadows and Darks | Greyish, lacking depth and solid contrast. | Crushed, faded matte blacks that give a film-like aesthetic. |
| Sky and Blues | Standard light blue, sometimes overexposed. | Deep teal/cyan, adding a strong color contrast against the subject. |
What Is Adobe Lightroom Mobile? An Essential Overview
Before we dive into applying the preset, it is crucial to understand the platform we are using. Adobe Lightroom is arguably the most powerful, industry-standard photo editing and color grading application available today, provided by the renowned software giant, Adobe Inc. While professional photographers have used the desktop version for years, the Lightroom Mobile App has revolutionized how we edit on the go. The best part? The core features of the Lightroom mobile app are completely free to use on both Android and iOS devices, making professional editing accessible to everyone.
Lightroom is not just a simple filter app like the ones built into your phone’s gallery. It is a comprehensive RAW image editor. This means it allows you to edit, retouch, and manipulate your photos with extreme precision without losing image quality. It gives you complete control over every single aspect of your photograph—from basic exposure and contrast adjustments to advanced color mixing, masking, and geometry corrections. By using Lightroom presets (which are essentially pre-saved editing formulas), you can harness the full power of this application with just one click, turning a very complex editing process into a simple, user-friendly experience.
Deep Dive: Lightroom Mobile Tools Explained
To truly master photo editing and get the most out of the Moody Orange preset, you need to understand how the tools inside Lightroom work. The app contains over 15 different tool panels located at the bottom of the screen. While the preset does the heavy lifting, knowing these tools allows you to fine-tune the photo if the lighting in your original picture was too dark or too bright. Let us talk about some of the most important tools in Lightroom and their specific functions.
1. The Light Tool (Exposure and Contrast)
The Light tool is the foundational element of any photo edit. It is responsible for the overall brightness and tonal adjustment of your photos. Here, you have to manually adjust the sliders to fix lighting mistakes made during the photoshoot. The options include Exposure (overall brightness), Contrast (the difference between light and dark areas), Highlights (the brightest parts of the image), Shadows (the darkest parts of the image), Whites, and Blacks. By holding the slider and moving it left or right, you can recover lost details in the sky or bring light into a dark subject. When you apply the Moody Orange preset, you might need to adjust the Exposure slider up or down slightly depending on how bright your original photo was.
2. The Color and Mix Tool (HSL Magic)
The Color tool is the heart and soul of the Moody Orange aesthetic. It contains basic adjustments like Temp (Temperature – making the photo warmer/yellow or cooler/blue), Tint, Vibrance, and Saturation. However, the real magic happens inside the “Mix Tool” (HSL – Hue, Saturation, Luminance). Inside the Mix tool, you will find eight distinct color circles. This tool allows you to target and change specific colors without affecting the rest of the image. For every single color, you have three sliders:
- Hue: Changes the actual shade of the color (e.g., turning green leaves into a teal/yellow shade).
- Saturation: Controls the intensity of the color (making it faded/grey or popping/vivid).
- Luminance: Controls the brightness of that specific color (making a blue sky darker or a red shirt brighter). The Moody Orange preset heavily utilizes this tool to desaturate greens and boost oranges.
3. Advanced Tools: Effects, Details, and Auto
Beyond light and color, Lightroom offers incredible tools for texture and sharpness. The Effects Tool allows you to add Texture, Clarity, and Dehaze (great for removing fog or adding dramatic contrast). It also contains the Vignette slider, which adds a dark shadow around the corners of your photo to focus the viewer’s eye on the center. The Detail Tool is used for Sharpening and Noise Reduction. If your photo was taken at night and looks grainy, increasing Color Noise Reduction here will make the skin look buttery smooth. Finally, there is the Auto Tool. By clicking this, Lightroom’s Artificial Intelligence automatically analyzes your photo and adjusts the light. You can always undo this by clicking the undo arrow at the top of the screen if you do not like the result.
Step-by-Step Guide: How To Edit Photos in Lightroom Mobile
If you are new to the application, the interface might seem a little intimidating at first. However, importing and editing your photos is a very straightforward process. You can open your photo in the Lightroom app directly by “sharing” it from your phone’s gallery, or you can import it directly from within the Lightroom app itself. Following the correct import process ensures your photos are organized and ready for the preset application.
Here is the exact process to get your photo ready for editing:
- Open the Lightroom app on your smartphone. At the bottom right corner, you will see a blue icon with a plus (+) sign and a picture symbol. Click on it.
- Your phone’s gallery will open, showing all your recent images. Browse through and tap on the photo (or multiple photos) you want to edit.
- Click on the “Add” button at the bottom right. You will see a small message pop up saying, “One photo successfully imported.”
- Now, click on the “All Photos” album located at the top left of the main screen.
- Find the photo you just imported, tap on it, and it will open in the main editing workspace. Your photo is now fully ready to be transformed using the tools or presets!
How To Download the Moody Orange Lightroom Preset
Downloading the preset from our website is designed to be as easy and hassle-free as possible. We do not use annoying pop-up ads or confusing redirect links. The preset is provided in a high-quality DNG (Digital Negative) format, which is the standard file type for Lightroom mobile presets because it carries all the color data and settings within the image itself.
To download the file, please follow these exact steps carefully:
- Scroll down towards the bottom of this article until you find the download section.
- Look for the large, distinctly marked Download (Green Colour) button.
- Click on that button. You will be redirected to a secure Google Drive link where the DNG file is hosted.
- On the Google Drive page, click the download icon (a downward-pointing arrow) at the top right corner of the screen.
- The file (usually named “Moody_Orange_Pabitra_Editography.dng”) will automatically download to your phone’s internal storage or “Downloads” folder.
How To Use and Apply Lightroom Presets in 1-Click
Many beginners get confused when they download a preset because it looks like a normal picture in their phone’s gallery. However, this DNG file contains all the hidden edit settings. The process of applying a preset is essentially copying the edit settings from my provided photo and pasting them onto your unedited photo. This “Quick Edit” feature is the most powerful time-saver in Lightroom.
Follow these simple steps to color grade your photo in a matter of seconds:
- First, open the Lightroom app. Click the “Add Photo” button and import the Moody Orange DNG preset file you just downloaded, just like you would import a normal photo.
- Next, import your own unedited photo that you wish to color grade.
- Open the Moody Orange preset (the DNG file) from your “All Photos” section.
- Tap on the three vertical dots located at the top right corner of the screen. A menu will appear.
- Select the “Copy Settings” option. A box will appear; make sure all the boxes are ticked (except Crop and Geometry) and press the right checkmark at the top.
- Now, go back and open your own unedited photo.
- Click those same three dots at the top right corner again, and this time, select “Paste Settings”.
- Wait just a few seconds, and boom! Your photo’s color grading is instantly complete.
Customizing the Preset: How to Tweak for the Perfect Look
A common misconception is that a preset is a magical fix that works 100% perfectly on every single photo without any effort. Because every photo is shot under different lighting conditions—some in harsh sunlight, some indoors, some on cloudy days—the preset might look slightly too dark, too bright, or too orange on your specific image. Therefore, doing a minor “tweak” or adjustment after pasting the settings is the mark of a true professional photo editor.
If the photo looks too dark after pasting the preset, simply go to the Light Tool and slowly increase the “Exposure” and “Shadows” sliders until the subject is clearly visible. If the skin tone of the person in the photo looks overly orange or unnatural, go to the Color Tool, then click on the Mix Tool, and select the Orange color circle. Slightly decrease the “Saturation” of the orange color and increase the “Luminance” (which brightens the skin). Furthermore, if the background feels too warm, you can slide the “Temp” (Temperature) slider slightly towards the blue (left) side to balance the atmosphere. A few seconds of manual tweaking will make the preset look like it was custom-made for your specific photograph.
System Requirements to Run Lightroom Mobile Smoothly
Adobe Lightroom is a heavy, professional-grade application that processes high-resolution RAW images and complex mathematical color algorithms in real-time. While it is optimized to run on most modern smartphones, having an outdated device might cause the app to lag, crash, or freeze when you are pasting heavy preset settings. To ensure you have a smooth, frustration-free photo editing experience, your device should meet certain minimum specifications.
Whether you are an Android enthusiast or an Apple iOS user, checking your system capabilities is important. Below is a detailed breakdown of the system requirements needed to run the Lightroom app efficiently:
| Feature / Specification | Android Devices Requirement | Apple iOS (iPhone/iPad) Requirement |
| Operating System | Minimum Android OS 6.0 (Marshmallow) or later. | Minimum iOS 14.0 or later. |
| RAM (Memory) | Minimum 3 GB RAM (4 GB or higher highly recommended). | Minimum 2 GB RAM (iPhone 6s/7 or newer). |
| Storage Space | At least 2 GB of free internal storage memory. | At least 2 GB of free internal storage memory. |
| Processor | Quad-Core CPU (Snapdragon or MediaTek equivalent). | Apple A9 chip or newer. |
| Supported Devices | Samsung, Xiaomi, Realme, Vivo, Oppo, OnePlus, etc. | iPhone 6s and above, iPad Air 2, iPad Mini 4, iPod Touch 7th Gen. |
How To Save Your Edited Photo in Maximum Quality
Once you have applied the Moody Orange preset, tweaked the exposure, and are fully satisfied with how your cinematic photo looks, the final step is exporting it safely to your device. Saving the photo properly ensures that you do not lose any pixel quality, sharpness, or color depth when you upload it to Instagram or Facebook. Lightroom provides excellent export options to keep your files looking crisp.
Saving your photo is incredibly simple. Look at the top right side of the Lightroom editing screen; you will see an icon that looks like three dots connected by lines (the Share icon). Click on that Share option. From the menu that pops up, simply click on “Save to Device”. Lightroom will take a few seconds to render the high-quality image, and it will be saved directly into a special “AdobeLightroom” folder in your phone’s main gallery. If you want more control, you can click on “Export As…” to manually choose the file format (JPG), image quality (set it to 100%), and even add your own custom text watermark before saving.
5 Pro Tips for Capturing Photos for Moody Orange Edits
Applying a preset is only half the battle; the foundation of a great edit is a great original photograph. If you capture a blurry, completely underexposed photo, no preset in the world can fully fix it. To get that jaw-dropping, professional Moody Orange look that you see on my YouTube channel, you need to keep a few photography tips in mind while clicking pictures with your phone or DSLR.
Here are 5 professional tips to help you capture the perfect base image for this preset:
- Shoot in RAW Format: If your phone camera supports it, always shoot in RAW rather than JPG. RAW files capture vastly more color data and dynamic range, allowing the preset to manipulate the colors beautifully without breaking the pixels.
- Find Green Backgrounds: The Moody Orange preset works best when there is color contrast. Try to pose your subject in front of trees, bushes, or grass. The preset will turn the greens into a dark cinematic tone while making the subject pop.
- Avoid Overexposure: It is much easier to brighten a dark photo in Lightroom than it is to recover a blown-out, pure white sky. Lower your camera’s exposure slightly while clicking.
- Utilize Golden Hour Lighting: Shoot during the early morning or late afternoon (golden hour). The natural warm sunlight perfectly complements the orange tones of this preset, making skin look naturally flawless.
- Keep the Wardrobe Neutral: Ask your subject to wear neutral colors like black, white, grey, or denim blue. Avoid neon green or bright pink clothes, as they can clash with the moody color palette of the preset.

Conclusion
Thank you so much for reading this comprehensive guide on the Moody Orange Lightroom preset. I have put a lot of hard work into creating this unique color tone, and I genuinely hope it helps you elevate your photo editing game to the next level. Whether you are editing photos for your personal Instagram feed or doing professional freelance work, this preset is designed to make your life easier and your photos more beautiful.
Please let us know in the comment section below how this Moody Orange preset worked for your photos! We always try to make the best, high-quality presets for all of our audience. Also, if there is any specific color tone preset (like Dark Brown, Aqua and Brown, or Cyberpunk) that isn’t available here, feel free to request it in the comments. We will try our absolute best to create and upload that requested preset as soon as possible. Keep editing, keep creating, and thank you once again for visiting Pabitra Editography!